Join Our Telegram channel to stay up to date on breaking news coverage

This guide will help developers and enthusiasts write and deploy their first smart contract. Coding skills will be helpful but are not mandatory for merely following the guide.
Also check out the previous post of this series: Trade Code: How to Determine Ethereum Arbitrage Opportunities Using Command Line On Cloud.
Smart Contracts and their Beginnings
Before diving into the first smart contract, it’s important to understand what it exactly is.
Nick Szabo in 1994, quoted the book “The New Palgrave: Allocation, Information, and Markets” in his iconic post, which defined smart contracts as:
“A smart contract is a computerized transaction protocol that executes the terms of a contract. The general objectives of smart contract design are to satisfy common contractual conditions (such as payment terms, liens, confidentiality, and even enforcement), minimize exceptions both malicious and accidental, and minimize the need for trusted intermediaries.”
In other words, smart contracts are self-enforcing, hones, verifiable, and trustable contracts which remove the dependency on intermediaries. There are two components which we have to keep in mind while working with a smart contract:
- EVM (Ethereum Virtual Machine): For those who have taken a Java Programming course, they must be aware of JVM (Java Virtual Machine), as it’s one of the first things taught in any Java course. EVM is the run-time environment for running Ethereum’s smart contracts and provide isolation to smart-contracts. Think of it as a private sandbox for executing smart contracts. Smart contracts, being caged inside EVM don’t have access to any processes, file networks, or other contracts. The purpose of Solidity language is to handle EVM operations.
- Gas: The price set up for every transaction; it is used to ensure that the appropriate fee is paid by the transaction which is submitted to the network by smart contract. All the operations performed in EVM incur a gas cost.
There are no tokens for gas and gas is not something which users can buy, accumulate, or speculate on. It exists only inside the EVM. Ultimately, ether is used for paying for gas.
Now the question arises why to make things complex? Why not use ether in the first place?
The answer is quite simple. All coins are volatile (excluding stablecoins, which are not related to a network but pegged to fiat currencies), but the price of computation should not fluctuate with market price.
Operation in EVM has a gas cost whereas gas itself has a gas price and that is measured in ether. Thus, total fee paid (in ether) indicates how much gas to be used for an operation multiplied by the gas price. Otherly, the formula looks like this:
Transaction fee = Total gas used * Gas price.
Here’s a sheet which shows the gas price for various operations (mostly computational/mathematical).
Ingredients for smart contract
There are two primary items we need to write a smart contract of which the first is a language. Here we are using Solidity. The second item is a platform to run Ethereum dApps in the browser, such as MetaMask.
- Solidity: Solidity is a high-level programing language having Python, Java, and C++ influences used to implement the smart contract. Solidity source file has pragmas, which are used to reject versions of compilers, that may introduce changes that are incompatible.
One can sign up for pragma here where we will write our first smart contract. Pragma is a platform for creating smart contracts.
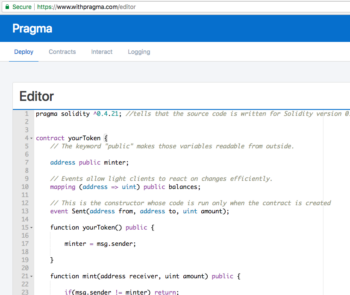
Pragma Editor
- MetaMask: MetaMask is used to run Ethereum dApps in the browser without running a full Ethereum node. You can get a metamask extension for your browser from here.
Ready, Steady, and Code
Before writing your first contract, first, you need to set the Pragma and MetaMask environment as Testing Environment, Kovan. We select Kovan because we don’t want to use actual Ether (which costs money) for our learning tutorial.
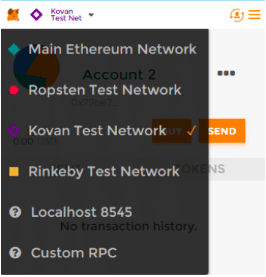
Select Kovan Test Environment
Code Snippet
pragma solidity ^0.4.21; //tells that the source code is written for Solidity version 0.4.21 or anything newer that does not break functionality
contract MyFirstContract {
// The keyword “public” makes those variables readable from the outside.
address public minter;
// Events allow light clients to react on changes efficiently.
mapping (address => uint) public balances;
// This is the constructor whose code is run only when the contract is created
event Sent(address from, address to, uint amount);
function MyFirstContract() public {
minter = msg.sender;
}
function mint(address receiver, uint amount) public {
if(msg.sender != minter) return;
balances[receiver]+=amount;
}
function send(address receiver, uint amount) public {
if(balances[msg.sender] < amount) return;
balances[msg.sender]-=amount;
balances[receiver]+=amount;
emit Sent(msg.sender, receiver, amount);
}
}
Understanding the Code Line by Line
1. Pragma Solidity ^0.4.21;
This line is used to tell that code is written for Solidity version 0.4.21 and above to ensure its compatibility with the newer version of the compiler.
2. Contract MyFirstContract
MyFirstContract is the name of our contract; the code resides under this block. A contract in Solidity is nothing but the collection of code(function) and data (state) that reside at a specific address in Ethereum blockchain.
3. Address Public Minter;
Minter is a variable name of address datatype which is readable outside of the contract due to its public access type. This is the address of the minter.
4. Mapping(Address => Uint) Public Balances;
This creates a public state variable balance but of complex data type. The type maps address to unsigned integers.
5. Event Sent(Address from, Address to, Uint Amount);
This is an event creation, and events allow the UI to react to change efficiently. Also, notice in the UI that balances are automatically generated.
6. Function yourToken() public {
minter = msg.sender;
}
This is a constructor of a smart contract, i.e., it is called automatically whenever the smart contract is executed. The Ethereum address from MetaMask is used as the minter. It stores the Ethereum address of the person creating the contract.
7. Function mint(address receiver, uint amount) public {
if(msg.sender != minter) return;
balances[receiver]+=amount;
The mint function helps us mint the tokens. “If” condition ensures that tokens are minted only by the creator of this contract. If a non-minter is creating them, then the function exists. Otherwise, the balance of the receiver is increased.
8. Function send(address receiver, uint amount) public {
if(balances[msg.sender] < amount) return;
balances[msg.sender]-=amount;
balances[receiver]+=amount;
emit Sent(msg.sender, receiver, amount);
The send function is a simple function which allows sending the token to another address. There are two parameters: Receiver and amount. If the sender is trying to send a higher amount of token that he possesses the function will not proceed further. Else, it will simply add the token in the receiver’s account and subtract from the sender account. The sent event is then called to do the transfer. We have assigned senders the same as the minter to simplify things.
Now our contract is ready. Let’s compile it.

Compilation
After compilation, click on “Deploy.”
If you are deploying for the first time, a message will pop up saying:
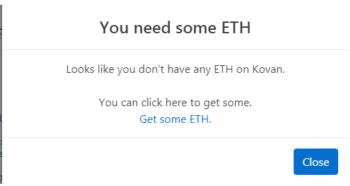
Just click on “Get some ETH” and it will redirect here.
Sign in and paste your MetaMask address in chat, then the bot will assign some ETH in your meta mask wallet. You can find out more here. Remember these are NOT real (mainnet) ether, and have no market value. It is only useful for testing and learning.
Click on Deploy on your Pragma Editor
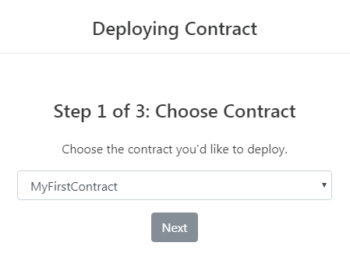
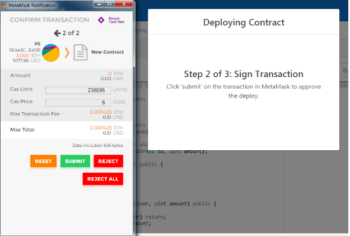
There will be three windows following that:
1. Select the contract:
2. Click on submit in MetaMask notification panel:
3. Click on contract, to see your first successfully deployed contract:
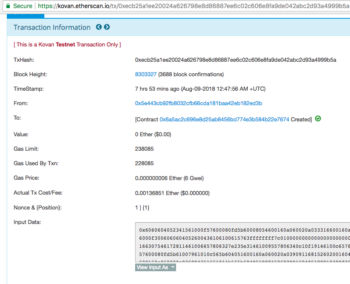
Once completed, metamask will show a confirmation link for this transaction:
Our smart contract is successfully deployed on Kovan test network, and we have finished the first transaction. Congratulations!
The post Trade Code: Writing your first Ethereum Smart Contract appeared first on BTCMANAGER.
Join Our Telegram channel to stay up to date on breaking news coverage